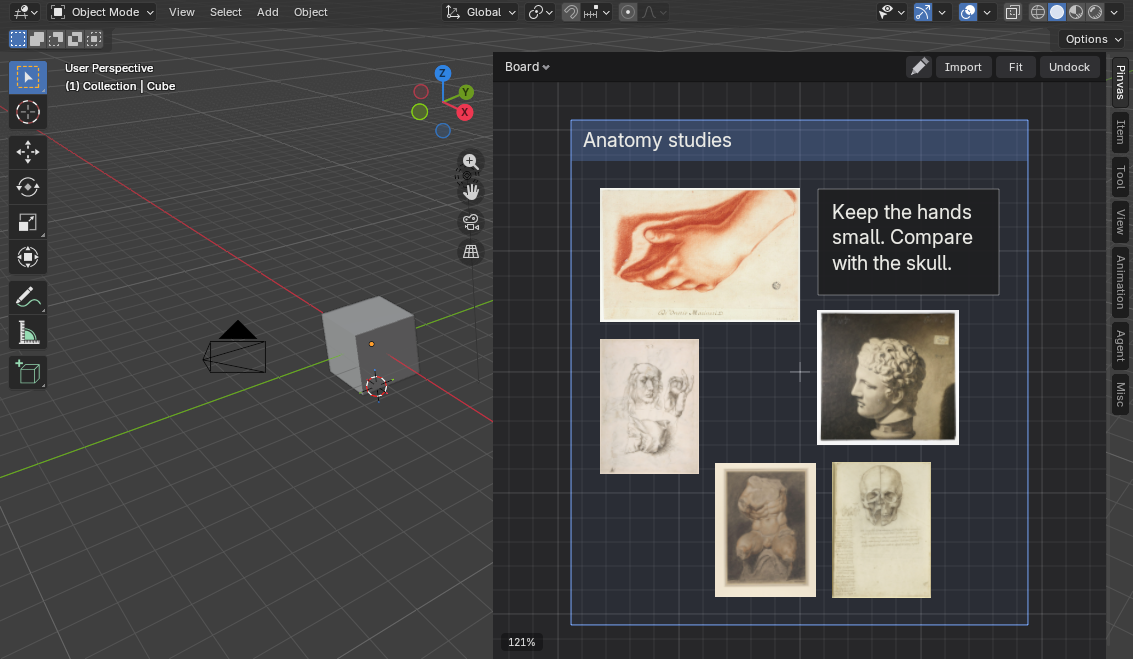
Select some pictures and press Ctrl+P. Optimal packs them into one tight block that fits your board. Group them under a titled Frame, or line them up from the Arrange menu.
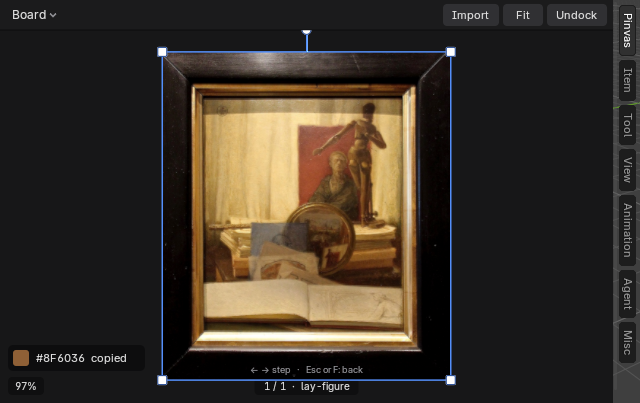
Press E, then click a picture. The colour under the mouse is copied as a hex code you can paste anywhere, or send To Brush or To Material from the right-click menu. Press F to view one picture on its own, and Esc to go back.
Drop a clip onto the board and press Space to play it. Step a frame with Left and Right, switch on Follow Timeline so the clip follows Blender's current frame, or loop one action with Set Loop Start Here and Set Loop End Here.
Draw mode: a loose circle with the Pen, then an ellipse, an arrow and a rectangle.
Press the pencil Draw button and a tool strip appears: Pen, Line, Arrow, Rectangle, Ellipse, Polygon, Text and Eraser. Hold Shift for a circle or a square and Alt to draw from the middle. Drawings stay on the board until you send them.
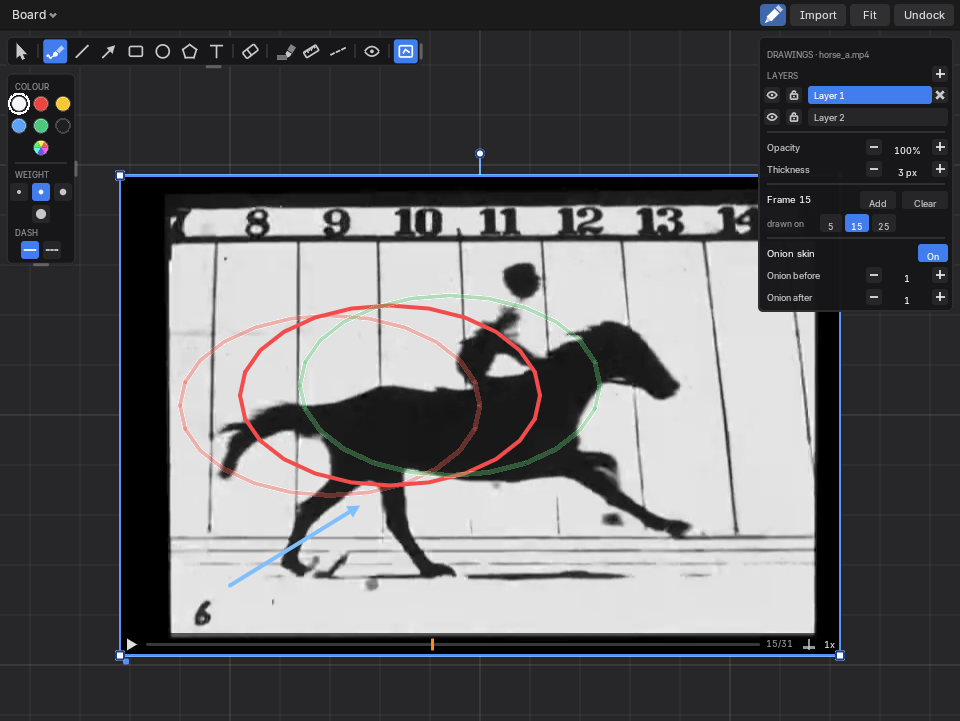
Circle with the Ellipse, point with dot-ended and arrow-headed lines, label with Text, then select and recolour.
Circle a part with the Ellipse, point at another with an Arrow, and click with the Text tool to type a label. An arrow can end in a round dot that marks one exact spot. Then press V or pick Select and click a drawing: pick a colour or weight in the style column and it takes it, in one undo step. Drag a drawing to move it. A line or arrow also has a round handle at each end: drag one to change that end.
Select your drawings, right-click and choose Send to Scene, then Drawing as Grease Pencil. You get one real Grease Pencil object with its colours, line weights, fills and arrow heads. A picture goes the same way, as an Image Plane, an Image Empty or a Camera Background.
Select some pictures and press Shift+P. Type a title and the frame fits round them. Drag the frame and everything in it moves; drag a picture out and the frame follows.
Right-click a picture for the board menu.
Right-click a picture for its tools. Send to Scene places it as a Camera Background, an Image Empty or an Image Plane. Greyscale, Flip Horizontally and the Proportion Grid help you judge it, and Overlay lets you see through the board to the viewport.
Paste and drop: Press Ctrl+V over the board to paste a screenshot, a copied picture or copied files. Drop files from your file manager onto it.
Pack: Press Ctrl+P to pack the pictures into one tight block shaped like your board.
Undock: Open the board in a window of its own with Undock and move it to any monitor, or carry it over a 3D View and let go on Dock here. The window is Windows only; elsewhere the board floats over the viewport.
Overlay: Remove the board's background so every click and key goes to the viewport, and trace or model through the pictures.
Video: Play, scrub and loop clips on the board, with frame stepping, and stitch several into one. Clips have no sound.
Send to Scene: Send a picture into your scene as a Camera Background, an Image Empty or an Image Plane.
Colour and focus: Press E to pick a colour from any pixel, and F to isolate a picture with Focus.
Drawing: The pencil Draw button opens a tool strip for lines, arrows, shapes, a highlighter and a ruler. Drawings belong to the picture or video they are on, and can be sent to the scene as Grease Pencil.
Frames and notes: Group pictures under a titled Frame and pin a Note. The board is saved inside your .blend file.
This takes about three minutes and ends with five pictures packed into one block beside your viewport.
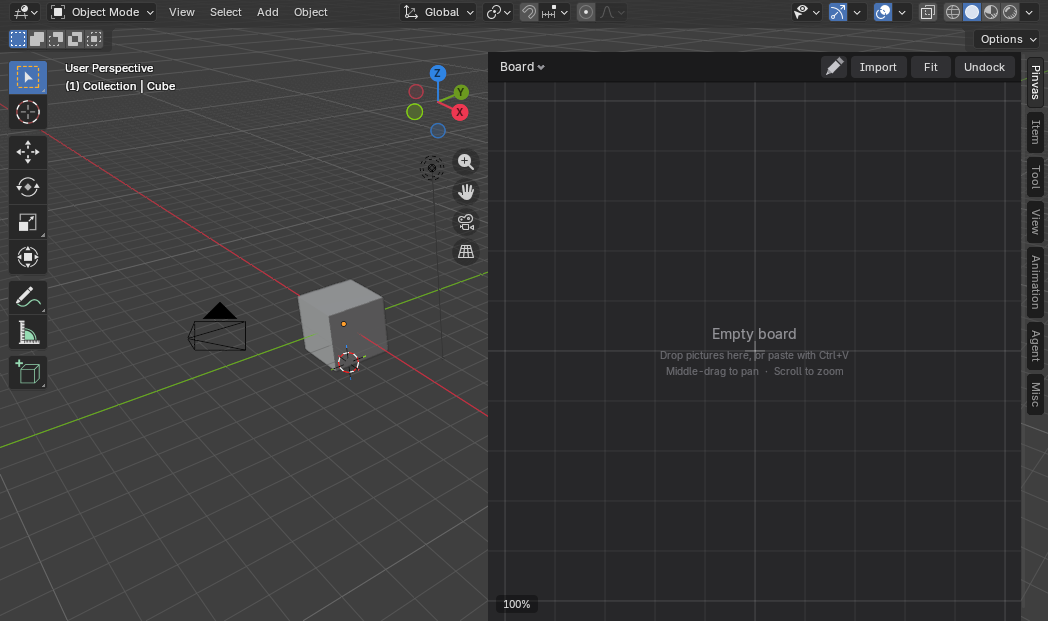
Open the Pinvas tab in the 3D View sidebar.
Click Import on the board's bar.
Select five picture files in the file window and confirm.
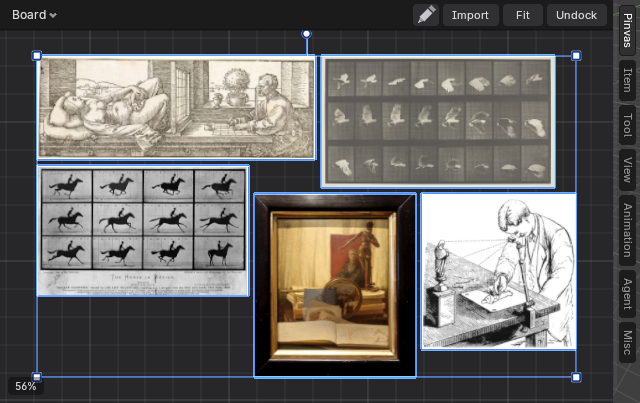
Move the mouse over the board and press Ctrl+P.
Press Home to fit every picture into view.
The pictures arrive in a row in the middle of the board, sized to fit, and stay selected. Ctrl+P is Optimal pack: with pictures selected it packs those, and with nothing selected it packs the whole board.
The result of Ctrl+P on five pictures.
Keys only act while the mouse is over the board. Everywhere else Blender behaves as usual.
Import, on the board's bar, or right-click and choose Import Pictures.... Select one or many files.
Drop picture files from your file manager onto the board. Blender asks which importer you mean, because its own Add Empty Image also takes a picture dropped on a 3D View. Choose Add to Pinvas Board. Dropped anywhere else in the viewport, Blender does what it always does.
Paste with Ctrl+V over the board: a copied picture, a screenshot, picture files copied in your file manager, or picture file paths copied as text.
The formats are PNG, JPEG, JPEG 2000, BMP, TGA, TIFF, EXR, HDR, WebP, PSD, DDS, Cineon, DPX and SGI. Videos come in the same three ways; see Videos.
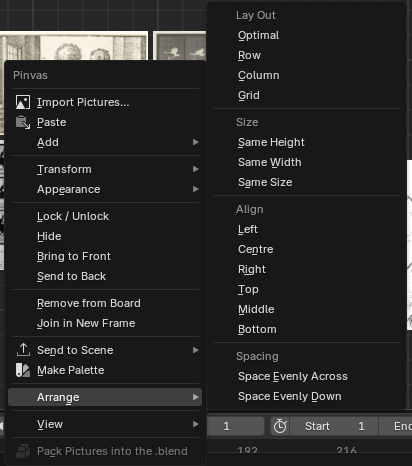
Right-click anywhere on the board for every picture command, grouped so the menu stays short.
The right-click menu, with Arrange open.
Submenu
What it holds
Add
Note, Frame, Render Result, Viewport Snapshot
Transform
Flip Horizontally, Flip Vertically, Straighten, Actual Size, Uncrop, Parent to Last Selected, Release from Parent
Appearance
Greyscale, Opacity..., Values..., Proportion Grid
View
Select All, Select None, Fit All, Fit Selected, Show Hidden, Focus, Overlay
Video holds the video commands, including Stitch, Open Stitch, Unstitch and Analyse. Send to Scene, Arrange and Make Palette are submenus or commands of their own. With nothing selected the menu holds only Import Pictures..., Paste, Add, Arrange, View and Pack Pictures into the .blend.
Flip Horizontally and Flip Vertically mirror a picture as you see it, whatever its turn.
Actual Size shows one picture pixel per board unit, which is 100% at 100% zoom.
Uncrop shows the whole picture again, where it was.
Bring to Front and Send to Back change which picture covers which.
Remove from Board (also X or Delete) takes the selected pictures off the board.
Taking a picture off the board does not delete its image at once. It goes when the file is saved and nothing else uses it.
G, S and R work as they do in Blender, with the mouse over the board: click, Enter or Space keeps the change; right-click or Esc drops it. X or Y during G locks the move to that axis. Ctrl snaps (grid steps, tenth steps of size, 15° turns) and Shift makes the mouse count a tenth. Shift+D duplicates the selection and moves the copies.
While one of these runs, a hint along the board's foot lists the keys that apply.
Undo with Ctrl+Z. Every move, scale, turn and edit is one step.
Arrange the board
Right-click and open Arrange to work on the selected pictures. Notes and drawings count as pictures here.
Arrange has four groups: Lay Out, Size, Align and Spacing.
Group
Command
What it does
Lay Out
Optimal (Ctrl+P)
Packs the pictures into one tight block shaped like the board, so they show as big as possible once the view fits them. With nothing selected it packs the whole board, and the view then shows it all.
Lay Out
Row, Column, Grid
Side by side with the tops level, one under another with the left edges level, or in rows and columns.
Size
Same Height, Same Width, Same Size
Gives each picture the selection's average height, width or area.
Align
Left, Centre, Right, Top, Middle, Bottom
Lines up their edges or middles.
Spacing
Space Evenly Across, Space Evenly Down
Equal gaps between three or more pictures; the outer two stay.
After Optimal, Row, Column or Grid, Blender's Adjust Last Operation panel (bottom left of the 3D View) changes the gap and the order. The order is as placed (reading order), by name, or as added.
Home or the Fit button on the board's bar shows every picture. Fit Selected, under View in the right-click menu, shows only the selection, and 1 (or a click on the zoom label at the board's bottom left) returns to 100%.
Judge a picture
These tools change what the board shows. They never change the picture file.
The colour under the mouse is read from the picture's own pixels, not from the screen. Pinvas copies it as #RRGGBB and shows a swatch with the word "copied" for a few seconds. Esc or a right-click cancels the pick.
The swatch after clicking the painting's wall; the picture is shown alone in Focus.
The strip stays up while the mouse is on it. Click a colour in it to copy its #RRGGBB again and make it the picked colour.
Right-click and choose Make Palette to turn the selected picture's main colours into a Blender palette, set for Texture Paint and Grease Pencil.
After a pick, right-click, open Picked Colour and choose To Brush to set the paint brush colour, or To Material to set the active object's material base colour.
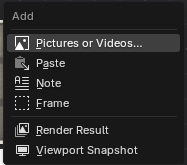
Press Shift+A over the board and choose Note, or right-click, open Add and choose Note. The note appears where the mouse is, ready to type.
Enter starts a new line.
Ctrl+V pastes text.
Esc, Ctrl+Enter or a click elsewhere ends the note.
Double-click a note to change it.
A note fits what you type: it widens with its longest line, and a line longer than a note's usual width wraps onto the next. Labels typed with the Text tool are notes too, so a one-word label is a small box.
While you type, every key goes to the note, so nothing reaches the viewport. A note left empty goes away.
Add > Frame draws a titled frame round the selection, or an empty frame when nothing is selected, and lets you type its title. Double-click the title to rename it.
A frame knows what it holds, as a frame does in Blender's node editor, and fits round it.
Pick a frame by its title strip or its edge. Inside it the board still box-selects.
Dragging the frame moves everything it holds, frames inside it included. Its handles resize it.
Let a picture go with the mouse over a frame and it joins that frame. A picture that is not in a frame stays out when a frame grows over it, and a picture you import or paste over a frame does not join it.
Move, scale or turn a picture in a frame and the frame fits round it as you drag. Arrange and Actual Size refit it too.
Drag a picture out of its frame and it stays in the frame, which grows to hold it. Take it out for good with Alt+P.
Optimal with a frame selected packs its contents inside it. See Arrange the board.
Shift+P, or Join in New Frame on the right-click menu, makes a new frame round the selection and lets you type its title. It works inside another frame too: the new frame sits in that frame. With nothing selected it does nothing.
Alt+P, or Remove from Frame on the right-click menu, takes the selected pictures out of their frame. They stay where they are and the frame shrinks. The menu item shows only when a selected picture is in a frame.
Shrink, a tick box on the right-click menu when a frame is selected, keeps the frame tight round what it holds. It is on for a new frame. Resizing a frame by hand turns it off, and the frame then keeps that size unless what it holds needs more.
Removing a frame leaves what it held on the board, in the outer frame if it had one. Duplicate a frame together with what it holds and the copy is a frame holding the copies. Export Board, Import Board and a board copied with Duplicate keep who holds what. A frame on a board from an older version keeps its size and takes in what lay inside it the first time you click on the board.
Press the pencil Draw button in the board's bar. A tool strip appears along the top of the board and a style column down its left edge. Draw mode starts off. It opens on the Pen the first time, and after that on the drawing tool you used last, which is kept with the scene. Esc goes back to Select.
Draw mode: a loose circle with the Pen, then an ellipse, an arrow and a rectangle.
Pick, move, resize and box-select, as ever. Drawings can be picked and moved too.
Pen
2
Draws freehand. When you let go the line is thinned and lightly smoothed.
Line
3
Drags a straight line.
Arrow
4
Drags a line with a head.
Rectangle
5
Drags a box.
Ellipse
6
Drags an ellipse.
Polygon
7
Click corners. Click the first corner to close the shape, or press Enter or right-click to end it open. A polygon that crosses itself is outlined and never filled.
Text
T
Click the board and type a note. It is the note you already have.
Eraser
8
Rubs out parts of drawings. Rubbing out part of a closed shape leaves a plain line.
Highlighter
9
Paints a wide, see-through stroke over what matters.
Ruler
0
Drag to measure. Its length, in board units (one to a pixel of a picture at 100%), and its angle show on it.
Guide
-
Drags a long dashed line for a sight line or a horizon.
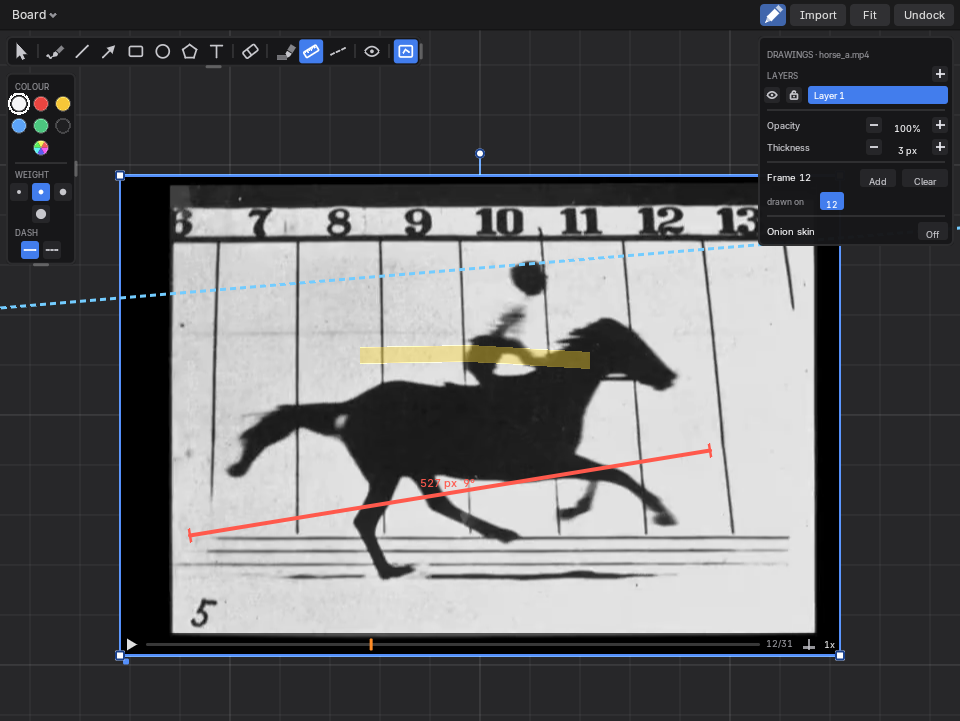
Highlighter, Ruler and Guide on a clip.
The number keys work only while Draw mode is on. Shift keeps a line to 15° steps and makes a rectangle square or an ellipse a circle. Alt draws from the middle. Esc or a right-click drops a drawing in progress. The eye at the end of the strip, Show drawings, hides every drawing so you can see the pictures clean; they stay on the board. Draw inside, next to it, is explained below.
COLOUR: six colour chips, with the colour in use first, then recent ones and the eyedropper's pick, and a last swatch that opens Blender's colour picker for any colour. Press E in Draw mode and the colour you pick from a picture becomes the drawing colour.
WEIGHT: 1, 2, 4 or 8 pixels.
FILL: none, light or solid. It shows for closed shapes only.
DASH: solid or dashed.
ENDS: what each end of a line or arrow has: nothing, an open head, a filled head, or a round dot. Click a tile to go to the next. A dot sits right on the spot the line ends at, so use it to point at one exact place. It shows for lines and arrows only.
With drawings selected, the column restyles them all in one undo step. With nothing selected it sets the style for the next drawing. Locked drawings are skipped, and a row that does not apply is not shown. On a board narrower than about 340 pixels the column is one swatch: click it to open the column.
Switch to Select and click a drawing. A line or arrow has a round handle at each end: drag one and the other end stays put (Shift keeps 15° steps, Esc puts it back). A rectangle or ellipse resizes freely from any corner or side. Drawings are board items, so they also move, scale, turn, flip, duplicate, lock, hide and undo like pictures. A filled shape is picked from inside; an unfilled one along its line, so the pictures under it stay reachable.
Circle with the Ellipse, point with dot-ended and arrow-headed lines, label with Text, then select and recolour.
The strip and the column each have a faint grip on their right edge and lower edge, as Blender's own toolbar has. Drag the right edge to change the width: the icons wrap into rows, and wider still, show their names. Drag the lower edge to make the icons bigger, with their spacing. Esc puts a drag back and a double-click on a grip restores the normal size. The sizes are kept in the add-on's preferences: Tool Strip Icon Size, Tool Strip Width, Style Column Icon Size and Style Column Width.
Draw inside, at the end of the strip, is on by default. With it on a drawing can only be started on a picture or a video. It belongs to the one it started on, stays inside that picture's edge, and moves, scales and turns with it. Starting on the bare board shows "Draw inside is on: start on a picture or a video (switch it off in the strip to draw on the bare board)". Switch Draw inside off to draw anywhere.
To make any items follow another, select them, then select the one that leads last, right-click, open Transform and choose Parent to Last Selected. Release from Parent lets them go; they stay where they are. Hiding or removing a parent takes its drawings with it. Flip, Straighten, lock and crop on a parent do not reach its drawings.
A drawing made on a video lives on the frame on show and holds until the next drawing, as Blender's Annotations do. Drawing on a playing video pauses it. Add a blank frame to end a held drawing.
With a picture or video selected in Draw mode, the drawing panel runs down the board's right edge. A board narrower than about 420 pixels has no room for it.
Layers: an eye shows or hides a layer and a lock stops it being changed or drawn on. The name picks the layer the next drawing goes on. Add and remove buttons make and delete layers; the last layer stays.
Opacity and Thickness of the picked layer, in steps.
Frame, for a video, is the frame on show. Add makes a blank frame and Clear empties what the picked layer holds at this frame. A chip marks each frame that has a drawing; click one to go to it.
Onion skin, On or Off, with Onion before and Onion after: the drawings before and after the one on show as faint ghosts, up to five each way.
Right-click a video, open Video and choose Analyse. The video opens alone with a timeline of its drawings. 
Click the timeline to go to a frame. Drag a drawing's tick to another frame to move it, hold Alt as you let go to copy it, and press X to remove it. Esc, F or a double-click goes back to the board.
The Annotate tools in the 3D View's toolbar still draw on the board when one of them is active, and so does D+drag (D+right-drag erases). Their lines take the active annotation layer's colour and thickness, and they are board items too.
Two circles and a sight line, drawn with the Annotate tool.
Annotate: a freehand line.
Annotate Line: a straight line.
Annotate Polygon: a line through each click. Enter, Space, a double-click or a right-click ends it.
Annotate Eraser: erases where its ring passes. The ring's size comes from Blender's preferences.
Lock / Unlock: a locked item can be selected but not moved, scaled, turned, cropped, erased or arranged. It shows a small lock.
Hide (H) takes the selection out of view. Show Hidden (Alt+H) brings everything back.
Videos
Videos come in the same way as pictures: Import, a drop, or pasted files. They stay linked to their files on disk and play without sound. Crop, flip, greyscale, values and the eyedropper all work on the frame on show.
Hover over a video, or select it, and a strip appears along its foot.
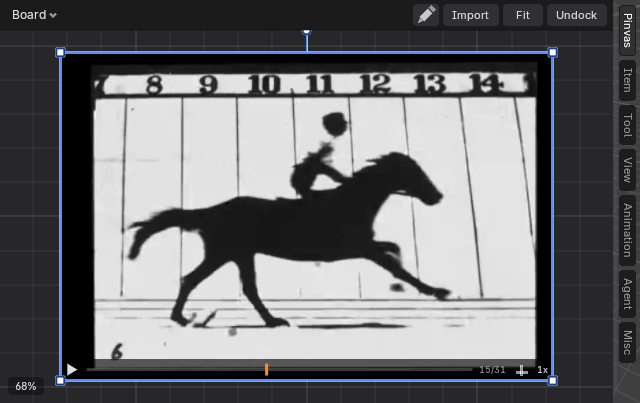
The strip: play, scrub bar, frame count, Follow Timeline and speed.
From left to right: the play button, the scrub bar with the loop range lit, the frame count (here 15 of 31), the Follow Timeline button and the speed. Rest the mouse on any part of the strip and a tip says what it does for the clip as it is now.
Play / pause: the button, or Space with the mouse over the board. With no video under the mouse, Space plays the selected videos; with none selected, it is Blender's own playback.
The clip plays at its own frame rate times its speed. Click the speed to step through 0.25x, 0.5x, 1x and 2x.
Scrub: drag along the bar.
Left and Right step a frame. Shift+Left and Shift+Right go to the start and the end.
Right-click, open Video and choose Set Loop Start Here or Set Loop End Here. Clear Loop plays the whole clip. Without a loop a clip stops on its last frame.
Follow Timeline (the small timeline button on the strip, or right-click > Video) makes the clip show the scene's frame plus an offset. Scrub Blender's timeline or play the scene and the clip follows.
Sync to This Frame sets the offset so the frame on show belongs to the scene's current frame.
A video can go to the scene whole, as a movie that plays; see Use the board with the scene. Its crop stays on the board.
Stitch videos
A stitch plays several videos one after another as one video. No file is cut or written: each clip has a start and an end marker, and only the part between them plays.
The videos go inside the stitch in reading order, with the last one wired to Output. The board shows the stitch as one video with a small mark on it and its length in seconds. It plays, scrubs, loops and changes speed like any video. Follow Timeline, a loop range, crop and Send to Scene are not available on a stitch.
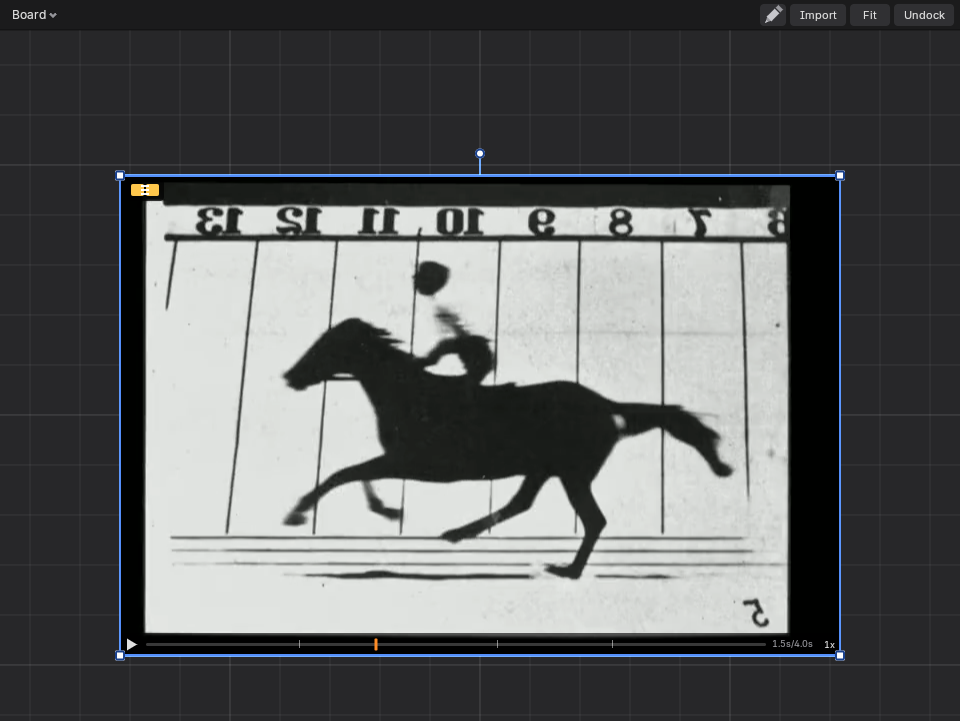
A stitch on the board, with its mark and its length in seconds.
Select the stitch, switch Draw on and draw as on any video. A drawing belongs to the frame of the clip you drew on. It shows while that clip plays, from that frame until the next drawing on the layer, and not in the other clips. The drawing panel's Frame, Add and Clear work on the clip showing, and its frame chips list that clip's drawn frames.
Because a drawing belongs to its clip, moving a node, reordering the chain or using the clip twice keeps it with the clip. A drawing outside a clip's trim waits there until the trim is widened. Taking a clip out of the stitch deletes its drawings (Ctrl+Z brings them back). Drawings already on a video, with their layers, move onto the stitch when it joins, and Unstitch gives them back to their videos. Analyse works on a video alone, not on a stitch.
Drag the videos you want onto a stitch on the board and let go with Shift held. Each joins the stitch after its last clip, wired on to Output, and leaves the board. Drawings made on it move onto the stitch and show while that clip plays. Several selected videos join in reading order. Without Shift they are only moved; a still picture is never taken in. It is one undo step.
To add a video from a file instead, open the stitch and use Add Videos... (below).
Double-click a stitch, or select it and press Tab (or right-click > Video > Open Stitch), and the board gives way to the stitch as nodes. Tab or Esc goes back.
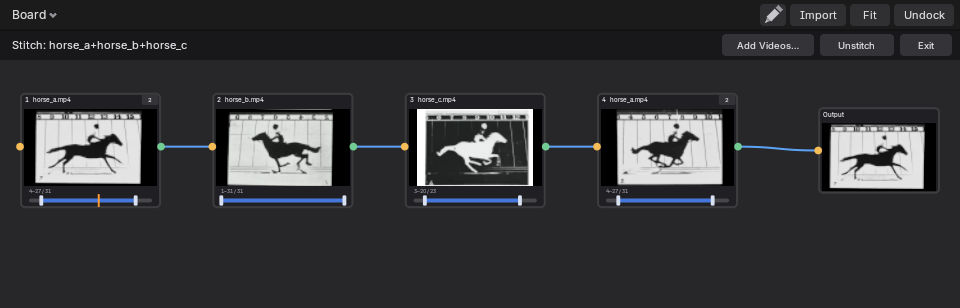
The stitch view: four clips wired to Output.
Each clip is a node with its picture, its name and its own timeline. Drag the start or end marker to set what plays.
Drag a wire from a node's way out (the green circle on its right) to another node's way in (the amber circle on its left). A node has one way in and one way out, and a wire that would make a loop is refused.
Drop a node that has no wires onto a wire and it joins the chain there. The wire lights up as the node passes over it, and on letting go the node sits between the two it joined. Onto the wire into Output, it goes on the end and Output plays it.
Drag on empty space to draw a box: the nodes it touches are selected (hold Shift to add to what is selected, Esc to put the old selection back).
Output ends the chain the board plays. Several chains can exist; the one wired to Output is the one that plays.
Shift+D makes another node on the same clip. The copies share one trim, so moving a marker on one moves it on all. A small count on the node says how many share it; click the count to give that node a trim of its own.
G moves the selected nodes, X or Delete removes them, A selects all, Alt+A selects none, Space plays and Home fits everything. Middle-drag pans and the wheel zooms.
Double-click the stitch's name to rename it.
Add Videos... in the strip along the top, or Ctrl+V or a drop, adds videos as new, unconnected nodes.
Unstitch brings each video back to the board, on its trim.
Every action in the view is one undo step. A clip whose file is missing is skipped. A stitch is saved with the .blend, and is kept by Duplicate, Duplicate Board, Export Board and Import Board.
In Blender's Video Editor, Send to Pinvas on the editor's header renders the scene's frame range to an MP4 and adds it to the board, to the right of what is there. The movie is written to a pinvas_sends folder beside the .blend (a temporary folder when the file is unsaved), numbered, and the scene's output settings go back as they were. Blender stays usable while it renders, and the video joins the board when the render ends.
If the render cannot start, the status bar says "Could not start the render" and why.
Add > Render Result puts the last render (F12) on the board, captioned with its time and frame. With no render yet Pinvas says "Nothing rendered yet: render first (F12)".
Add > Viewport Snapshot puts the 3D View as it is now on the board, without the board itself.
Add Renders Automatically, in the Boards menu, puts every finished render on the board. See Boards and files.
Select a picture, right-click and open Send to Scene:
Choice
What you get
Camera Background
The picture as the active camera's background image.
Image Empty
An image empty at the 3D cursor, facing the view.
Image Plane
A textured plane at the 3D cursor.
Crop, flips, turn and opacity are kept. A cropped picture sends a packed copy of the part that shows. A video sends as a movie that plays; Pinvas then says "A video goes whole: its crop is only on the board".
Select drawings made in Draw mode, right-click and open Send to Scene:
Choice
What you get
Drawing as Grease Pencil
One Grease Pencil object at the 3D cursor, facing the view.
Drawing as Grease Pencil, in Front of Camera
The same object in front of the scene's camera, facing it.
A sketch sent as Grease Pencil, then a picture as an Image Plane.
The object has one layer. Lines, arrows with their heads, rectangles, ellipses, polygons, Pen strokes, dashed lines and fills are kept, with their colours and line weights, and a light fill stays see-through. It is sized like an Image Plane: as tall as one, however big the drawings are on the board. It is one undo step. Notes and pictures are not sent, and the entries are greyed when no drawing is selected.
Make Palette turns a picture's main colours into a Blender palette. If the picture is fully transparent Pinvas says "No colours to take: the picture is transparent".
After an eyedropper pick (see Judge a picture), Picked Colour has two choices:
To Brush sets the paint brush colour. With no paint brush active, Pinvas says "No paint brush to give it to".
To Material sets the base colour of the active object's material. With no object or no material, Pinvas says "Select an object with a material first".
Show with in the Boards menu links the current board to the selected object. With Follow Selection on, selecting that object brings its board up. With no object selected, Pinvas says "Select an object first".
Boards and files
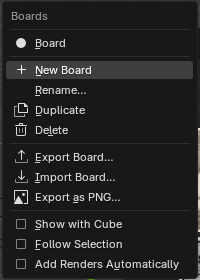
The title on the board's bar is the board's name. Click it for the Boards menu.
The Boards menu.
Item
What it does
The board names
Show that board.
New Board, Rename..., Duplicate, Delete
As named. The last board is only emptied, never removed.
Export Board...
Saves the board as a .pinvas file: the board and the bytes of every still picture inside it. Videos travel by their path.
Import Board...
Brings a .pinvas file in as a new board. A picture whose file is still where it was is linked again; otherwise it comes in packed.
Export as PNG...
The whole board as one picture, at 1x or 2x, at most 8192 pixels.
Show with
Links the board to the selected object.
Follow Selection
Selecting an object a board is shown with brings that board up.
Add Renders Automatically
Every finished render lands on the board.
On a floating or undocked board, drag the title to move the board and click it for the menu.
Blender saves the board with the .blend file, in the scene. Imported pictures stay linked to their files on disk, with paths relative to the .blend once you have saved it, so the .blend stays small. Pasted pictures have no file of their own, so Pinvas packs them into the .blend.
Before you move or send a file, right-click and choose Pack Pictures into the .blend. It packs every linked picture on the board and reports how many it packed.
A picture whose file cannot be found shows as a red Missing box with its name, so you always see what is gone. Videos always stay linked, so a moved .blend needs its video files to move with it.
Exporting and importing boards report what happened: "Board saved to ..." with a picture count, Board "...": ... item... after an import, and "Board saved as ..." with the size after a PNG export. The failures are listed on Troubleshooting.
Undock, on the board's bar, opens the board in a window of its own, right where it was. Drag the window's title bar to move it anywhere, even onto another monitor. Drag its edges or corners to resize it; an outline follows and the window takes the size when you let go.
On Windows, Undock opens a real window. On other systems it floats the board over the viewport instead, moved by its title bar and resized from its corner.
Carry the window over a 3D View. That view shows a small Dock here pad in the middle of its sidebar, or by its right edge when the sidebar is closed.
Let go on the pad. The board docks into that view's sidebar with the same view and selection.
Let go anywhere else and it stays a window. Esc or a right-click while carrying it sends it back to where the drag began. Dock on the window, or Dock It Here in the sidebar it came from, puts it back too.
The undocked window stays above Blender's main window. Saving docks it first, so a saved file never holds an undocked board, and Ctrl+S inside the window docks it and saves.
Blender draws small arrows for its hidden regions at the undocked window's edges. They do nothing there.
The board shows in one place at a time. Any other 3D View with the Pinvas tab open says where the board is, "in another view" or "in a window of its own", and offers Dock It Here. That button moves the board there with its view and selection.
Switch on Overlay (the half-disc button on a floating board, or right-click > View > Overlay). The board's background goes, the pictures show at the overlay opacity, and every click and key away from the bar goes to the viewport. You can trace or model through the board. Right-click to change the overlay opacity.
Double-click a picture, or press F, to show that picture alone, fitted. The arrow keys step through the board's pictures and videos in reading order. Esc, F or a double-click goes back to the board as it was.
Zoom in or out at the mouse (crossing 100% stops on it)
Ctrl+middle-drag
Zoom smoothly (drag up or right to zoom in)
Ctrl+scroll, Shift+scroll
Pan sideways, pan up and down
Trackpad two-finger pan and pinch
Pan, zoom
Home or Fit
Show every picture
1 or a click on the zoom label
Back to 100%
Keys act only while the mouse is over the board. The keys Pinvas uses stay with the board even when nothing is selected, so they never reach the viewport under a floating board.
Keys and mouse
Every key here acts only while the mouse is over the board. Over the rest of Blender, Blender's own keys apply.
The clipboard held something Pinvas could not read as a picture. The reason is in the brackets after the message. Save the picture to a file and use Import instead.
Send to Pinvas could not start Blender's render. The text after the colon says why, often a movie output setting or a folder Blender cannot write to. Fix that setting in the Video Editor's scene, then click Send to Pinvas again. The scene's output settings are put back whatever happens.
The picture is linked to a file that has moved or been deleted. Put the file back where it was, or import it again. To stop this happening, right-click and choose Pack Pictures into the .blend before moving or sending a file. See Boards and files.
Over the board, letters are shortcuts. S starts a scale and E starts the eyedropper. Press Esc to drop the action. To type text, open a note first; see Notes, frames and drawing.
Notes fit their text. A note, and a label typed with the Text tool, is as wide as its longest line, up to a note's usual width, where lines wrap. See Notes.
Dot ends. A line or arrow can end in a round dot that marks one exact spot: click an end tile in the style column's ENDS row until it shows the dot. See Notes, frames and drawing.
Stitch videos. Select two or more videos, right-click, open Video and choose Stitch. They play one after another as one video, each trimmed without cutting any file, and you wire them like nodes. See Stitch videos.
The stitch view works like Blender's node editor. Left-drag on empty space draws a box that selects the nodes it touches, and middle-drag pans. A node with no wires dropped on a wire joins the chain there. Ways in are amber and ways out green, and the wires are smooth curves that end in the middle of their circles. See Stitch videos.
Drawings on a stitch belong to the clip frame they were made on. They show only while that clip plays, hold within it and follow the clip when it moves. The drawings of a video go onto the stitch with it, and Unstitch gives them back. See Stitch videos.
Draw mode starts drawing. Draw opens on the Pen the first time, and afterwards on the drawing tool you used last, kept with the scene. The Pen tool's picture is now a pen nib drawing a curve.
Smooth edges everywhere. Rounded buttons and panels, turned boxes, discs, slanted lines and rounded outlines have a soft one-pixel edge instead of a stair-stepped one.
A new Draw button picture: a plain pencil, so it never reads as the Pen tool's nib-and-curve tile.
A new stitch mark on the board: two film frames with white thread across the seam.
The style column never cuts a label short. A heading too long for a narrow column is left out, and a list widens until every name fits.
Shift-drop videos onto a stitch to add them: let go selected videos over a stitch with Shift held and they join it after its last clip, wired to Output. Without Shift they only move. See Stitch videos.
Send to Pinvas. A button on the Video Editor's header renders the scene's frame range to a movie and puts it on the board.
Analyse. Right-click a video, open Video and choose Analyse to see it alone with a timeline of its drawings.
Draw inside. A drawing made on a picture or video belongs to it and moves, scales and turns with it. Parent to Last Selected does the same for any items. See Drawings that belong to a picture.
Drawings on a video sit on a frame and hold until the next one, on layers, with a drawing panel and an onion skin.
Three more tools.Highlighter (9), Ruler (0) and Guide (-).
Bars you size like Blender's toolbar. Drag the tool strip's or style column's right edge for a grid, then names, and the lower edge for bigger icons. The Draw button is a pencil, and the cursor is a pencil in Draw mode.
Fixed: Optimal, Row, Column, Grid and Same Height, Same Width and Same Size laid drawings out as pictures of their own. A drawing now stays on its picture and goes where the picture goes.
Fixed: the eraser no longer cuts drawings that are not on show and keeps the pieces on their picture, layer and frame. The lock icon on a layer was blank.
The preferences are now Tool Strip Icon Size, Tool Strip Width, Style Column Icon Size and Style Column Width.
A real rotate icon. Over the round knob above a selected picture, video or frame, and all through a turn, the cursor is a curved arrow with a head on each end. It has a dark rim, so it shows on light and dark pictures. It replaces the straight double arrow, which looked like a resize arrow. The corner, side and line-end handles keep their own cursors.
The board framework bundled inside Pinvas moves to a newer version. Nothing you can see changes: a board paints pixel for pixel the same, and the drawing tools work as before.
Send drawings to the scene as Grease Pencil. Right-click, open Send to Scene and choose Drawing as Grease Pencil, or Drawing as Grease Pencil, in Front of Camera. The selected drawings become one Grease Pencil object with one layer, with their colours, line weights, fills and arrow heads. It is sized like an Image Plane, and it is one undo step. Notes and pictures are not sent.
A Text tool. Press T in Draw mode, or use the T button after Polygon: click the board and type. It is the note you already have; an empty one disappears.
Any colour. The colour grid ends with a swatch that opens Blender's colour picker. The colour you pick becomes the drawing colour, recolours the selection and joins the recent colours.
Drag handles on the bars. The tool strip and the style column each have a grip on their right edge and lower edge. Make the strip thicker, leaner and longer and the column wider and longer; the sizes are kept in the add-on's preferences.
A rotate cursor. Over the round turn handle, and while turning, a double arrow shows which way it turns.
The Pen thins and lightly smooths a line when you let go.
Change what you drew. A line or arrow has a round handle at each end. A rectangle or ellipse can be resized freely, width and height apart.
The style column works on the selection. Pick a colour, weight, fill, dash or arrow head and every selected drawing takes it, in one undo step. Rows that do not apply are not shown.
A filled shape is picked from inside.
Show drawings, the eye at the end of the strip, hides every drawing without removing it.
E in Draw mode makes a picked colour the drawing colour.
Smoother lines, and redrawn icons on the strip and the column.
Draw mode. The pencil button in the board's bar turns on a tool strip with Select, Pen, Line, Arrow, Rectangle, Ellipse, Polygon and Eraser, and a style column for colour and line weight. Shift keeps a line to 15° steps or makes a square or a circle; Alt draws from the middle. It starts off.
Drawings have round ends and corners, filled arrow heads, and can be closed, filled and dashed.
Boards from before open unchanged, and the Annotate tools and D+drag draw as they always did.
Frames work as they do in the node editor. A frame knows what it holds and fits round it: drag a picture out and the frame grows, move it back and the frame shrinks. Dragging the frame still moves everything it holds.
Let a picture go over a frame and it joins. A picture already in a frame stays in it until it is taken out.
Alt+P removes the selection from its frame. The pictures stay where they are and the frame shrinks away.
Shift+P makes a new frame round the selection, even inside another frame.
Shrink on the right-click menu of a frame. Resizing a frame by hand turns it off, so the frame keeps that size unless what it holds needs more. Frames on older boards keep their size and hold what lay in them.
Copying a frame with what it holds gives a frame holding the copies. Removing a frame leaves what it held on the board.
Import lists videos as well as pictures, so a video can be chosen without changing the file filter.
Render Result works with any output format, multilayer EXR included. The scene's own output settings are left as they were.
A snapshot's caption, its time and frame, now shows under the picture and not only in Focus.
Export as PNG... no longer freezes Blender on the largest boards, and Viewport Snapshot is faster too.
Send to Scene refuses a picture whose file is missing and names it, instead of failing or making an empty object. A cropped picture sent as an Image Empty is the right size. In Edit Mode or Pose Mode the object you are working on stays active.
Picked Colour > To Material fills an empty material slot so the colour shows, instead of adding another slot.
Import Board... says so when a file is not a board, and leaves no half-made board behind.
Paste and Import from a menu put the picture where the menu was opened. Pasting or dropping a picture while in Focus leaves Focus, so the new picture shows. A right-click while typing a note ends the typing.
Export Board... works from the Boards menu again. Import Board..., Export as PNG..., Import Pictures..., Add > Pictures or Videos..., Rename, Opacity... and Values... now open their file browser or dialog too.
Export Board..., Import Board... and Export as PNG... say what to do when no file was chosen, and no longer write a nameless file into Blender's own folder.
The colour strip that the eyedropper and Make Palette show is now clickable. Each colour is a button: a click copies its #RRGGBB, makes it the picked colour and outlines it. The strip stays while the mouse is on it.
Pinvas now runs on a shared board framework bundled inside it. The board, its keys, its menus and saved boards work as before, and boards from earlier versions load unchanged.
Undock into a window of its own, with the Dock here drop target.
Pictures: import, drop, paste, select, move, scale, turn, flip, order, pack, and saved with the .blend.
Support
If you need help with Pinvas, email support@oebs-studios.com or use Get support at oebs-studios.com. In the support form, choose the add-on and describe the issue.
These details help us see what you are seeing:
Your Pinvas version (1.0.0 is the one documented here) and your Blender version.
Whether the board was docked in the sidebar or undocked in a window, and your operating system.
The steps you followed, what you expected and what happened, and the exact message Blender showed.
A screenshot of the board and the Blender editor around it.
For a picture problem, the picture's file format and whether it was imported, dropped or pasted.
Any error text from Blender's system console. On Windows, open Window > Toggle System Console.
If you can, send a small .blend file that shows the problem.